Quick Start Guide
Step 1. Getting API Credentials
- Before using the 8B API, you must obtain API credentials (login and password) from our Support Team. These credentials are required to generate an access token and authenticate your requests.
- To receive your API credentials, please contact our Support Team: [email protected].
- You will be issued separate credentials for each:
- Sandbox credentials are used for testing your integration in a safe environment.
- Production credentials are used for live payment processing and must be handled securely.
Step 2. Authentication & Authorization
Getting Access and Refresh Tokens
Authentication in the 8B API is based on a token system. It follows the OAuth 2.0 framework, specifically the Resource Owner Password Credentials grant type, where tokens are issued in exchange for company credentials. When you log in using your company credentials, the API returns two tokens:
| Token Type | Description | Validity |
|---|---|---|
| Access Token | Used in the Authorization header for authenticating API calls | 30 minutes |
| Refresh Token | Used to obtain a new access token when the current one expires | 35 minutes |
How It Works

- Send a POST request to
/configuration-management/api/v1/admin-accounts/oauth/authorizewith your login and password. - Receive both access and refresh tokens in the response body.
- Use the access token in the Authorization: Bearer YOUR_TOKEN header for all authenticated API requests.
Updating Access Token with Refresh Token
When your access token expires (after 30 minutes), you can obtain a new one without re-authenticating by using the refresh token.
How It Works

- Send a POST request to
/configuration-management/client/api/v1/auth/refresh-tokenwith your refresh token in the request body. - Receive a new access token in the response.
- Replace the expired access token in your API requests with the new one.
Token Endpoints
| Endpoint | Description |
|---|---|
| POST /configuration-management/api/v1/admin-accounts/oauth/authorize | Create a new Access Token |
| POST /configuration-management/api/v1/admin-accounts/oauth/refresh-token | Update an Access Token using a Refresh Token |
Step 3: Setting Up Webhooks
Webhooks allow our system to automatically notify your application when specific events occur (e.g., when a transaction status changes).
Provide Your Webhook URL
- You must supply a publicly accessible HTTPS endpoint that can receive POST requests from our servers.
- The webhook URL can be specified in the dedicated fields in the requests.
Webhook Trigger
A webhook will be sent for each status change of a payment transaction. This ensures your system always stays in sync with the latest transaction state.
Payload Format
We send POST requests with a JSON body containing transaction details and status.
{
  "transactionType": "PAYMENT",
  "transactionId": "111122223333444455",
	"status": "ACCEPTED"
}
{
"transactionType": "PAYMENT",
"transactionId": "111122223333444455",
"status": "ERROR",
"errorCode": "CODE_PT0000",
"errorMessage": "string"
}Some webhooks may contain additional data. The inclusion of this additional data depends on the payment method and may or may not be present in the request.
{
  "transactionType": "PAYMENT",
  "transactionId": "111122223333444455",
  "status": "CAPTURED",
  "additionalData": {
    "PaymentMethodAdditionalField": "string",
    "PaymentMethodAdditionalField": "string",
    "PaymentMethodAdditionalField": "string"
  }
}You can find more information in the webhook section
Step 4. Creating New Transactions
Please select a transaction type to access the relevant API integration details
Related Entities
| Entity | Description |
|---|---|
| Intent | A container that groups one or more payments representing a user's intention to pay |
| Payment | An individual transaction representing a transfer of funds as part of an intent |
| Payment Authorization | A step that confirms the payment method has sufficient funds and reserves the amount for capture |
| Payment Capturing | The process of collecting the authorized funds and completing the transaction |
| Auto-Capturing | A feature that automatically captures authorized payments without requiring a separate manual step |
Simplified Model
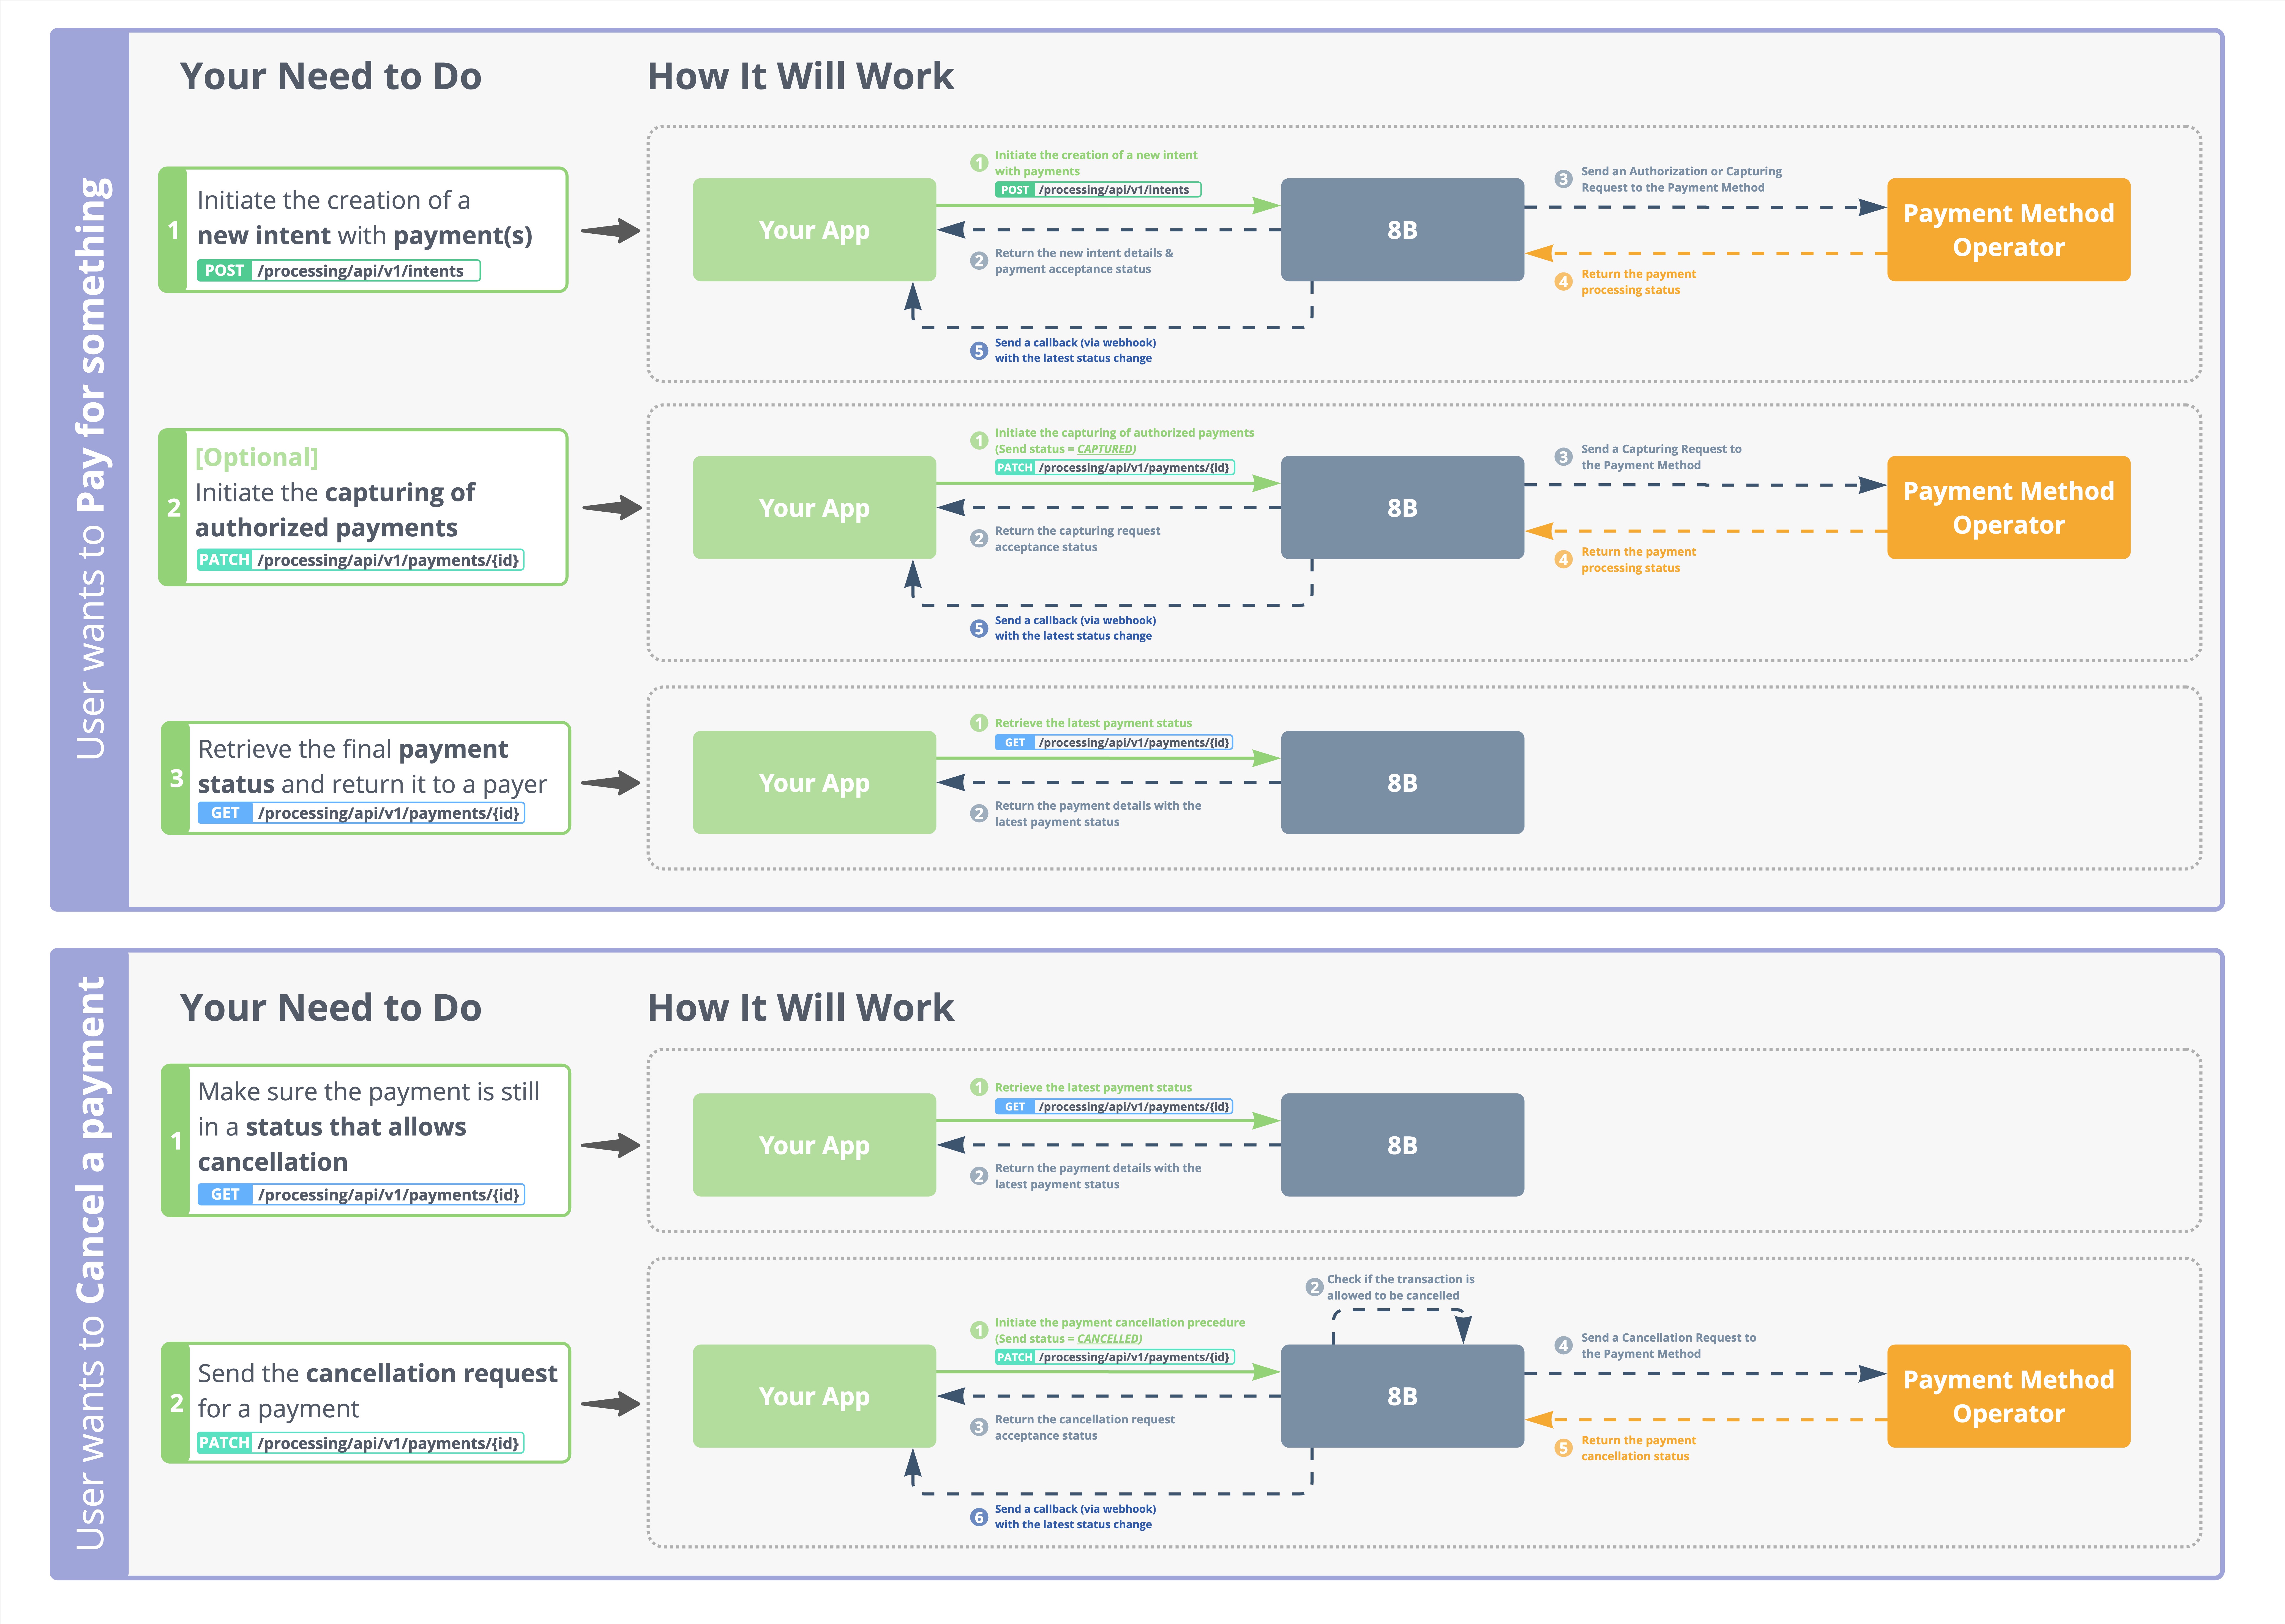
This diagram illustrates the general payment flow in a simplified form.
Certain payment methods may involve additional steps, such as generating a QR code or completing a 3DS check.Detailed step-by-step sequences will be provided separately for each payment method.
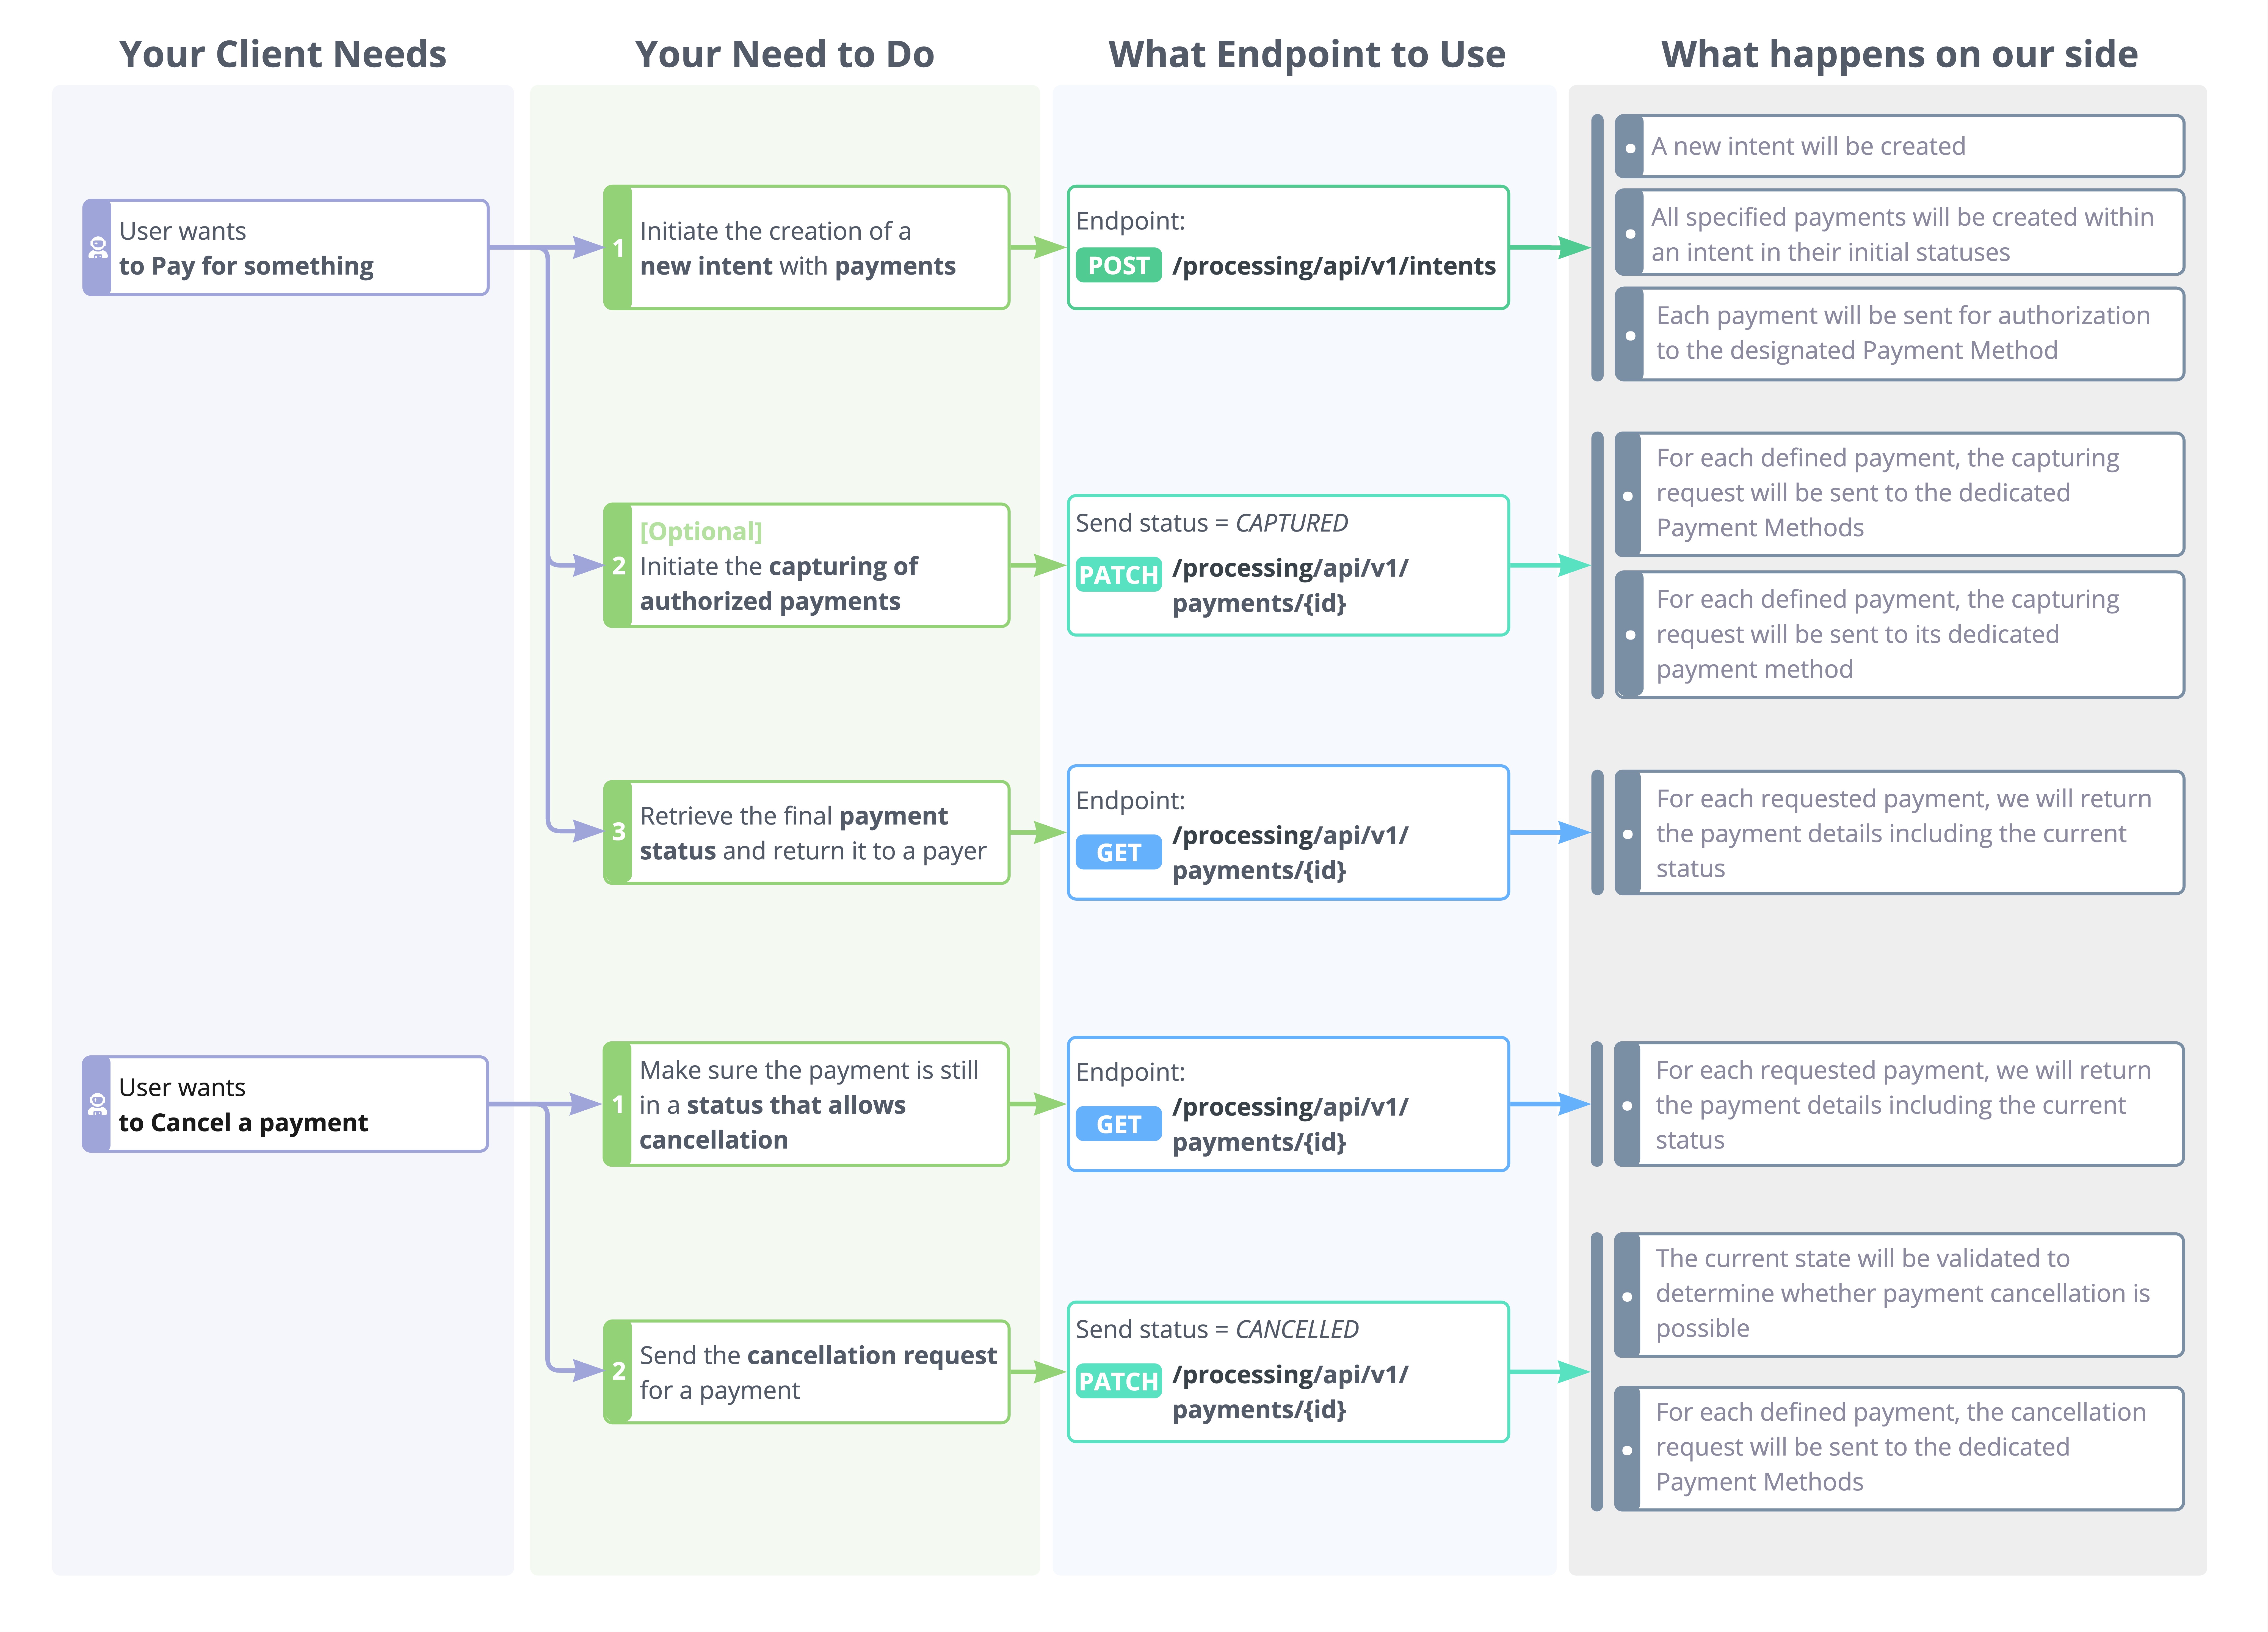
Use Cases and Solutions

Action Sequence

Endpoints Description
| Endpoint | Description |
|---|---|
POST /processing/api/v1/intents | Initiate the creation of a new intent with payments |
PATCH /processing/api/v1/payments/{id} | Initiates a payment status change. Possible values include: CAPTURED, CANCELLED |
GET /processing/api/v1/payments/{id} | Retrieve the payment details and its current status |
Payment Status Model

Updated 3 months ago
